Dimmer — dimmable backlight
Dimmer is for your panel's backlighting: the strings of LEDs behind the panel that light up the
legends and markings. It follows the cockpit's lighting knobs, so when you turn up the console
lights in DCS, your panel brightens to match, and when you turn them down, it fades with them.
Not quite the right part?
- A light that is simply on or off, like a warning lamp? Use LED.
- Something none of the built-in classes cover? Use IntegerOutput, which hands the value to your own code.
In your sketch
const PinRef CONSOLE_LIGHTS_PIN = PinRef(PA6);   // backlight connector J_BL1

OpenSkyhawk::Dimmer consoleLights(A_4E_C_LIGHTS_CONSOLE, CONSOLE_LIGHTS_PIN);
These two lines go near the top of your sketch, above setup(), and they are all the code a
backlight needs. From then on the board sets the brightness by itself every time the knob in the
sim moves.
The first line is the pin address. PA6 is the pin that controls the
board's first backlight connector, J_BL1, so that's where the LEDs are plugged in. The second
line creates the dimmer. consoleLights is a name you choose, and A_4E_C_LIGHTS_CONSOLE is the
cockpit lighting it follows. Unlike an LED, a dimmer only needs the one name, because
DCS sends each lighting level on its own.
Wiring
The board has two backlight connectors, J_BL1 and J_BL2, and each one dims its own string of
LEDs. A backlight string is wired like this:
- Five red LEDs in a row, the short leg of each to the long leg of the next.
- A 120 Ω resistor from pin 1 of the connector (+12V) to the first LED's long leg.
- The last LED's short leg to pin 2 of the connector (the return).
Five LEDs in a row use up most of the 12 V, and the resistor takes the rest, which holds the string at about 18 mA. Pin 2 isn't a ground, though: the board switches it on and off a thousand times a second, far too fast to see, and the longer it stays on each time, the brighter the string looks.
This is called PWM, and only some of the board's pins can do it. That's also why a dimmer can't go on an expander or a shift register: those chips can't switch a pin fast enough to dim, so the board refuses rather than give you a backlight that only turns on and off.
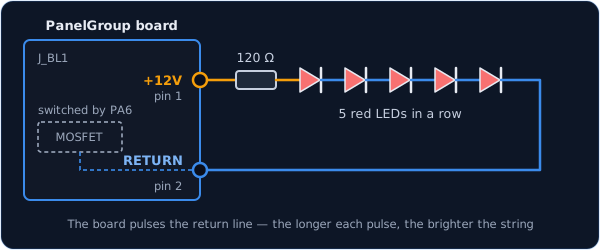
This is how every panel is lit. J_BL1 is dimmed by pin PA6 and J_BL2 by pin PA7, so
one board can follow two different knobs — the console lights on one connector and the
instrument lights on the other.
const PinRef CONSOLE_LIGHTS_PIN    = PinRef(PA6);   // J_BL1
const PinRef INSTRUMENT_LIGHTS_PIN = PinRef(PA7);   // J_BL2

OpenSkyhawk::Dimmer consoleLights(A_4E_C_LIGHTS_CONSOLE, CONSOLE_LIGHTS_PIN);
OpenSkyhawk::Dimmer instrumentLights(A_4E_C_LIGHTS_INSTRUMENTS, INSTRUMENT_LIGHTS_PIN);
Connector & Harness Guide shows the connector itself.
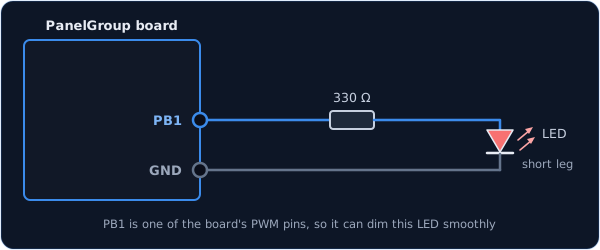
For a single small LED on your desk, a few of the board's own pins can dim too: PA0, PA1,
PA2, PA3, PB0 and PB1. Wire the LED exactly as you would for an LED,
with its 330 Ω resistor.
const PinRef CONSOLE_LIGHTS_PIN = PinRef(PB1);
Troubleshooting
The backlight never comes on.
Check that the dimmer is on PA6, PA7 or one of the PWM pins listed above. Any other pin — an
expander pin, or PA4/PA5 — can't dim, so the board leaves it switched off and, with
debugging turned on, prints
[Dimmer] pin is not a timer-capable GPIO — output disabled.
The backlight stays dark even with the right pin. It follows the sim exactly, so a dark cockpit means a dark panel. Make sure the aircraft has electrical power and the matching lighting knob in the cockpit is turned up.
The backlight is always at full brightness. The string is wired to GND instead of to pin 2 of the connector, so the board can't switch it. Move that wire to pin 2.
Going further
DCS sends the lighting level as a number from 0 to 65535, and the board turns it into 256 brightness steps. When the board starts up, every backlight is off and stays off until DCS sends its first level.
LEDs look much brighter at low power than you'd expect, so the bottom of the knob's travel can seem too bright. You can reshape the response with a small function, added as a third argument. This one squares the value, so the low end dims much more gently:
uint16_t gentle(uint16_t value) {
    return (uint32_t)value * value >> 16;
}

OpenSkyhawk::Dimmer consoleLights(A_4E_C_LIGHTS_CONSOLE, CONSOLE_LIGHTS_PIN, gentle);
There's no true to flip a dimmer the way there is for an LED: a higher value is
always brighter. If you ever need it the other way round, the same kind of function can
return 65535 - value.
The A-4E has five lighting levels a dimmer can follow: A_4E_C_LIGHTS_CONSOLE,
A_4E_C_LIGHTS_INSTRUMENTS, A_4E_C_LIGHTS_FLOOD_RED, A_4E_C_LIGHTS_FLOOD_WHITE and the
radar scope glow, A_4E_C_APG53A_GLOW.
Dimmer belongs to a small family of outputs that each take one cockpit value;
AnalogOutput explains what they share.
Every detail of the class is in the API reference.